10/08/2014

One Skirt, Two Outfits.

Outfit number 1:


Skirt: Forever21 
Jumper: Topshop
Denim Jacket: Momma's wardobe 
Brogues: New Look

Outfit number 2:


Skirt: Forever21
Top: Topshop
Heels: New Look

So, I decided to give today's outfit post a little bit of a twist and show how I would style one skirt for two different occasions.

I spotted this skirt walking through Forever21 last week and I thought it was so cute and for only 12 euro I just had to buy it, although all these impulse buys are adding up and my bank account's not too happy about it.. but what can ya do! 

The first look is how I would style the skirt to wear to college or on a shopping day, I kept it casual with the tights and brogues and warm with the amazing fluffy jumper and denim jacket.

The second look is more of a night time look, I kept the colours minimal so I could add a pop of colour to my lips. Throw on your favourite dancing shoes and you're good to go! 

Adele x

10/05/2014

Make your own scrunchie

Remember the shorts I jazzed up a while ago? Well I had some material left over from it and decided to not let it go to waste and make a little scrunchie out of it. They're pretty popular lately and with shops like American Apparel charging anything up to 15 euro for one I'd quite happily rather make my own.. and here's how!

 You will need:
Material
elastic
A needle and thread
scissors
A safety pin

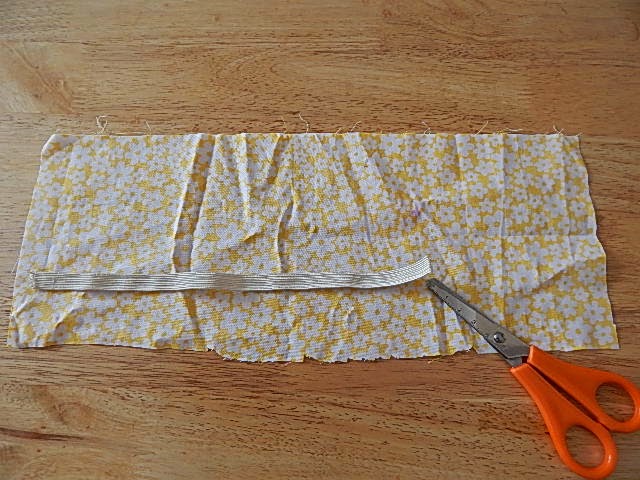
 Firstly, cut your material approximately 45cm long and 10cm wide. Your elastic should always be shorter than the material.

 Fold the material over inside out and sew across the top using the needle and thread.

 After sewing your material turn it inside out so the stitched disappear and the material is the right way. Attach a safety pin to your elastic and feed it through the hole in the material, pulling it out and the other end.

 After you've put your elastic through the material it should look like this. Take off your safety pin and sew the two ends of the elastic together.

 Neatly sew the two ends of your material together.

And this is how it should look in the end. Don't worry if you mess it up it takes a few attempts to get it right, also there's always great videos on youtube to bring you through each step if you're struggling with it.

I hope everyone had a lovely week and weekend! 
Adele x

10/01/2014

The Outfit | Two


Bralet: Diy
Maxi Skirt: Asos
Shirt: Vintage

To me, this outfit does nothing but scream Summer.. which is a little depressing now that the season is well and truly over. But hey, only 8 months until it makes a comeback! 

I bought the skirt and tie dyed a bra I picked up in Penny's (Primark) a month or two ago. I planned on the colours in the bralet being a lot more vibrant but I think the pastel colours go perfectly with the skirt and my 'spongebob shirt' brings that much needed add of colour. 


I hope the week is treating everyone well, don't worry the weekend is only 2 days away! 
Adele x

9/28/2014

Big Yay For Clay!

You Will Need:
Clay 
Ingredients of your choice
A small container

Face masks and saving money are two of my favourite things in life.. so combining the two sounds like a good time to me! I've recently discovered dry clay and how amazing it is so I thought I would share a few recipes I've come up with for all skin types. You can buy dry clay from ebay, simply type in face mask clay and choose whichever one you want! 

Now onto the good stuff.

Combination/Oily skin:
 4/5 table spoons of clay
 3 drops of tea tree oil
 3/4 table spoons of water
 A lemon segment
This is the one I use for myself and it works a treat!

Dry skin:
4/5 table spoons of clay
3/4 table spoons of coconut oil
1 table spoon of honey (preferably manuka honey)

Sensitive skin:
4/5 table spoons of clay
3/4 table spoons of milk 
1 table spoon of aloe vera


Simply throw all of your ingredients into a bowl, mix everything together and voila... Face mask! I store mine in a small container in the fridge to keep it fresh and use it about twice a week, leaving it on my face for half an hour at a time.

Don't be afraid to mess around with different ingredients and find out what works best for you, leave me comments below if you do try it out, i'd love to know how you got on! 

I hope everyone had a lovely weekend, I can already feel my Monday blues coming on.

Adele x


9/19/2014

Spice up ya shorts!

You will need:
Old Shorts
Fabric glue
Scissors 
Fabric of your choice

Step 1:
Cut your fabric into the shape of one side of your shorts. Be sure to cut it a little larger than the actual shape as this will help in step 2.

Step 2:
Using the fabric glue fold the sides of the fabric over and stick it onto the denim. Folding it over ensures that it won't ravel over time. Only glue the fabric around the edges of the shorts, this allows them to have more movement and not be stiff from the glue.

Step 3:
Repeat the exact same process on the back pocket. Cutting the shape out of the fabric, slighter larger, fold the edges and stick it down. 


And there you go! So easy and cheap to do!

I fiiiinnaally got around to painting my shed white so I have a place to take outfit pictures. I've also started college this week, which means I will be busier but I'll also have more of a routine and in turn be able to make blog posts a much more regular thing. So with all this in mind stick around for weekly posts and please don't be afraid to leave your comments below. 

Have a lovely weekend!
Adele x

9/02/2014

Electric Picnic was a wonderful time.


I'm already missing Glitter, cans and curry chips for breakfast. Until next year ep <3
Adele x

8/18/2014

Diy hair mask.

Being a student, i'm a huge fan of low budget beauty.. so if that means spending an extra 10 minutes making my own hair mask opposed to picking one up in a shop for a 5er then so be it!


Now for the sciency bit..The two main ingredients of this mask is egg yolk and olive oil. Egg yolk, containing vitamin A, D and E will prevent hair loss and thicken thin hair while also making it softer, shinier and all round healthier. Olive oil also strengthens and softens while strengthening the colour of your hair and maintaining it's texture. 

You will need:
2 egg yolks
2 table spoons of olive oil
1/2 a cup of luke warm water


Simply mix everything together and massage into dry hair. Leave it in for 15-20 minutes and shampoo as normal. 

This mask is ideal for dry or damaged hair and also if you're looking for it to grow a little faster, it's effective enough that you only have to do it 1-2 times a month. 

 Do let me know how you got on with it if you gave it a try and also leave comments below on any diy hair masks you like.. i'd love to hear about them! 

Adele x


8/10/2014

Amtsterdam, I never knew you so well.

So, I went to Amsterdam for 5 days last week and here's a little picture montage of what we got up to. 


Amsterdam, you were lovely.
Don't worry though Dublin... you're lovelier. 

Adele x